
ການປັບແຕ່ງໜ້າກາກ ແລະ ການຄວບຄຸມເພີ່ມເຕີມ
ເມື່ອມີການໃຊ້ໜ້າກາກ, ຈະມີແຖບເລື່ອນເພີ່ມເຕີມປະກົດຂຶ້ນ ເຊິ່ງຊ່ວຍໃຫ້ທ່ານສາມາດປັບແຕ່ງ ໜ້າກາກໃຫ້ລະອຽດຂຶ້ນໄດ້.
- ເກນລາຍລະອຽດ (details threshold)
- ສ່ວນຄວບຄຸມນີ້ຊ່ວຍໃຫ້ທ່ານປ່ຽນຄວາມທຶບແສງຂອງໜ້າກາກຕາມປະລິມານລາຍລະອຽດໃນຮູບ. ໃຊ້ ແຖບເລື່ອນນີ້ເພື່ອເລືອກບໍລິເວນທີ່ມີລາຍລະອຽດຫຼາຍ (ຄ່າບວກ) ຫຼື ບໍລິເວນທີ່ລຽບ ແລະ ບໍ່ມີລາຍລະອຽດ (ຄ່າລົບ). ຄ່າເລີ່ມຕົ້ນ (ສູນ) ຈະຂ້າມການປັບແຕ່ງນີ້. ສິ່ງນີ້ມີປະໂຫຍດ ຫຼາຍໃນການໃຊ້ເອັບເຟັກຄວາມຄົມຊັດ ຫຼື ຄວາມມົວ ໂດຍການຂ້າມບໍລິເວນທີ່ຢູ່ນອກໂຟກັດ (bokeh) ຫຼື ເນັ້ນຄວາມຄົມຊັດສະເພາະສ່ວນທີ່ມົວ ເພື່ອບໍ່ໃຫ້ສ່ວນທີ່ຊັດຢູ່ແລ້ວຄົມເກີນໄປ.
ໝາຍເຫດ: ຂໍ້ມູນທີ່ໃຊ້ສຳລັບການປັບແຕ່ງໜ້າກາກລາຍລະອຽດແມ່ນມາຈາກຂັ້ນຕອນ demosaic ຫຼື rawprepare ໃນທໍ່ການປະມວນຜົນ, ບໍ່ແມ່ນມາຈາກຂາເຂົ້າຂອງໂມດູນ (ເຊິ່ງໃຊ້ກັບ ເກນໜ້າກາກແບບກຳນົດຄ່າອື່ນໆ). ໂມດູນໃດໆຫຼັງຈາກຂັ້ນຕອນ demosaic ຈະບໍ່ມີຜົນຕໍ່ ໜ້າກາກລາຍລະອຽດ ແລະ ມັນບໍ່ສາມາດໃຊ້ໄດ້ກັບຮູບທີ່ບໍ່ແມ່ນ RAW.
- ຕົວນຳການເຮັດຂອບຟຸ້ງ (feathering guide)
- ການເຮັດຂອບຟຸ້ງຂອງໜ້າກາກ (mask feathering) ຈະເຮັດໃຫ້ຂອບຂອງໜ້າກາກກ້ຽງຂຶ້ນ ເພື່ອໃຫ້ຂອບຂອງໜ້າກາກຈັດວາງໃຫ້ກົງກັບຂອບຂອງສິ່ງຕ່າງໆໃນຮູບພາບໂດຍອັດຕະໂນມັດ. ການເຮັດໃຫ້ກ້ຽງນີ້ແມ່ນຖືກນຳໂດຍຮູບພາບຂາເຂົ້າ ຫຼື ຂາອອກຂອງໂມດູນ (ກ່ອນການປະສົມ), ແລະ ອາດຈະເກີດຂຶ້ນກ່ອນ ຫຼື ຫຼັງການເຮັດໃຫ້ໜ້າກາກມົວ, ຂຶ້ນຢູ່ກັບສິ່ງທີ່ເລືອກໃນລາຍການເລືອກ “feathering guide”. ການເຮັດຂອບຟຸ້ງແມ່ນມີຄວາມອ່ອນໄຫວເປັນພິເສດຕໍ່ກັບການເລືອກຮູບພາບຕົວນຳ ເມື່ອໃຊ້ກັບໂມດູນທີ່ປັບແຕ່ງຂອບ (ໂມດູນສໍາລັບການເຮັດໃຫ້ຮູບຄົມຊັດ ຫຼື ມົວ).
- output before blur: ການເຮັດຂອບຟຸ້ງແມ່ນຖືກນຳໂດຍຮູບພາບ ຂາອອກ (output) ຂອງໂມດູນ ແລະ ເກີດຂຶ້ນ ກ່ອນ ທີ່ໜ້າກາກຈະຖືກເຮັດໃຫ້ມົວ
- input before blur: ການເຮັດຂອບຟຸ້ງແມ່ນຖືກນຳໂດຍຮູບພາບ ຂາເຂົ້າ (input) ຂອງໂມດູນ ແລະ ເກີດຂຶ້ນ ກ່ອນ ທີ່ໜ້າກາກຈະຖືກເຮັດໃຫ້ມົວ
- output after blur: ການເຮັດຂອບຟຸ້ງແມ່ນຖືກນຳໂດຍຮູບພາບ ຂາອອກ (output) ຂອງໂມດູນ ແລະ ເກີດຂຶ້ນ ຫຼັງຈາກ ທີ່ໜ້າກາກຖືກເຮັດໃຫ້ມົວແລ້ວ
- input after blur: ການເຮັດຂອບຟຸ້ງແມ່ນຖືກນຳໂດຍຮູບພາບ ຂາເຂົ້າ (input) ຂອງໂມດູນ ແລະ ເກີດຂຶ້ນ ຫຼັງຈາກ ທີ່ໜ້າກາກຖືກເຮັດໃຫ້ມົວແລ້ວ
- ລັດສະໝີຂອບຟຸ້ງ (feathering radius)
- ປັບຄວາມແຮງຂອງເອັບເຟັກຂອບຟຸ້ງ. ການເຮັດຂອບຟຸ້ງຈະເຮັດວຽກໄດ້ດີທີ່ສຸດຫາກຂອບຂອງໜ້າກາກນັ້ນໃກ້ຄຽງກັບບາງຂອບໃນຮູບພາບຕົວນຳຢູ່ແລ້ວ. ຍິ່ງ “ລັດສະໝີຂອບຟຸ້ງ” ໃຫຍ່ເທົ່າໃດ, ອັນກໍຣິທຶມການເຮັດຂອບຟຸ້ງກໍ່ຈະສາມາດຈັດວາງໜ້າກາກໃຫ້ກົງກັບຂອບທີ່ຢູ່ໄກອອກໄປໄດ້ດີຂຶ້ນ. ແນວໃດກໍ່ຕາມ, ຫາກລັດສະໝີນີ້ໃຫຍ່ເກີນໄປ, ໜ້າກາກທີ່ຟຸ້ງອອກມາອາດຈະເກີນຂອບເຂດ (ປົກຄຸມບໍລິເວນທີ່ຜູ້ໃຊ້ຕ້ອງການຍົກເວັ້ນ). ການເຮັດຂອບຟຸ້ງຈະຖືກປິດໃຊ້ງານເມື່ອລັດສະໝີຂອບຟຸ້ງຖືກຕັ້ງເປັນ 0.
- ລັດສະໝີຄວາມມົວ (blurring radius)
- ການເຮັດໃຫ້ໜ້າກາກມົວຈະຊ່ວຍສ້າງການປ່ຽນຜ່ານທີ່ນຸ້ມນວນລະຫວ່າງສ່ວນທີ່ປະສົມ ແລະ ບໍ່ປະສົມ ແລະ ຊ່ວຍຫຼີກລ່ຽງສິ່ງແປກປອມ (artifacts). ແຖບເລື່ອນນີ້ຄວບຄຸມລັດສະໝີຂອງການມົວແບບ Gaussian ທີ່ຈະໃຊ້ກັບໜ້າກາກສຸດທ້າຍ. ຍິ່ງລັດສະໝີສູງ ຄວາມມົວກໍຍິ່ງຫຼາຍ (ຕັ້ງເປັນ 0 ເພື່ອບໍ່ໃຫ້ມົວ). ຄວາມມົວຂອງໜ້າກາກຈະຖືກໃຊ້ຫຼັງຈາກການເຮັດຂອບມົວ (feathering) ສະເໝີ ຖ້າເປີດໃຊ້ທັງສອງຢ່າງ, ເພື່ອຊ່ວຍໃຫ້ຂອບທີ່ຄົມ ຫຼື ສິ່ງແປກປອມຕ່າງໆເບິ່ງນຽນຂຶ້ນ.
- ຄວາມທຶບແສງຂອງໜ້າກາກ (mask opacity)
- ຄວາມແຮງຂອງເອັບເຟັກໃນໂມດູນແມ່ນຖືກກຳນົດໂດຍຄວາມທຶບແສງສະເພາະບ່ອນຂອງໜ້າກາກ. ການເຮັດຂອບຟຸ້ງແລະການເຮັດໃຫ້ໜ້າກາກມົວອາດຈະເຮັດໃຫ້ຄວາມທຶບແສງຂອງໜ້າກາກເດີມຫຼຸດລົງ. slider “ຄວາມທຶບແສງຂອງໜ້າກາກ” ຊ່ວຍໃຫ້ທ່ານສາມາດປັບຄວາມທຶບແສງຂອງໜ້າກາກຄືນໃໝ່ເພື່ອຊົດເຊີຍໄດ້. ຫາກຄວາມທຶບແສງຂອງໜ້າກາກຫຼຸດລົງ (ຄ່າ slider ເປັນລົບ) ສ່ວນທີ່ທຶບແສງໜ້ອຍກວ່າຈະໄດ້ຮັບຜົນກະທົບແຮງຂຶ້ນ. ໃນທາງກົງກັນຂ້າມ, ຫາກຄວາມທຶບແສງຂອງໜ້າກາກເພີ່ມຂຶ້ນ (ຄ່າ slider ເປັນບວກ) ສ່ວນທີ່ທຶບແສງຫຼາຍກວ່າຈະໄດ້ຮັບຜົນກະທົບແຮງຂຶ້ນ. ຜົນທີ່ຕາມມາຄື, ສ່ວນຂອງໜ້າກາກທີ່ທຶບແສງທັງໝົດຈະຍັງຄົງທຶບແສງຢູ່ສະເໝີ ແລະ ສ່ວນທີ່ໂປ່ງໃສທັງໝົດກໍ່ຈະຍັງຄົງໂປ່ງໃສຢູ່ສະເໝີ. ສິ່ງນີ້ເພື່ອໃຫ້ແນ່ໃຈວ່າບໍລິເວນທີ່ຖືກຍົກເວັ້ນທັງໝົດ ຫຼື ຖືກລວມເຂົ້າທັງໝົດໃນເອັບເຟັກຂອງໂມດູນ (ໂດຍການຕັ້ງຄວາມທຶບແສງຂອງໜ້າກາກເປັນ 0% ຫຼື 100%) ຈະຍັງຄົງຖືກຍົກເວັ້ນ ຫຼື ລວມເຂົ້າຄືເກົ່າ.
- ຄວາມຄົມຊັດໜ້າກາກ (mask contrast)
- ແຖບເລື່ອນນີ້ໃຊ້ເພື່ອເພີ່ມ ຫຼື ຫຼຸດຄວາມຄົມຊັດ (contrast) ຂອງໜ້າກາກ. ສິ່ງນີ້ຊ່ວຍໃຫ້ ທ່ານປັບການປ່ຽນຜ່ານລະຫວ່າງສ່ວນທີ່ທຶບແສງ ແລະ ໂປ່ງແສງຂອງໜ້າກາກໄດ້.
-
 ປິດໜ້າກາກຊົ່ວຄາວ
 - ບາງຄັ້ງມັນມີປະໂຫຍດທີ່ຈະເບິ່ງຜົນຂອງໂມດູນໂດຍບໍ່ມີໜ້າກາກ. ຄລິກໃສ່ໄອຄອນນີ້ເພື່ອປິດ ການເຮັດວຽກຂອງໜ້າກາກຊົ່ວຄາວ (ໂດຍທີ່ໂໝດການປະສົມ ແລະ ຄວາມທຶບແສງລວມຍັງມີຜົນຢູ່).
-
 ສະແດງໜ້າກາກ
 - ຄລິກໃສ່ໄອຄອນນີ້ເພື່ອສະແດງໜ້າກາກປະຈຸບັນເປັນສີເຫຼືອງຊ້ອນທັບເທິງຮູບແບບຂາວດຳ. ສີເຫຼືອງເຂັ້ມໝາຍເຖິງຄວາມທຶບແສງ 100%; ສ່ວນພື້ນຫຼັງສີເທົາທີ່ເຫັນຊັດເຈນ (ບໍ່ມີສີເຫຼືອງ) ໝາຍເຖິງຄວາມທຶບແສງ 0%.
🔗ຕົວຢ່າງ: ການເຮັດຂອບມົວໃຫ້ໜ້າກາກແບບແຕ້ມ
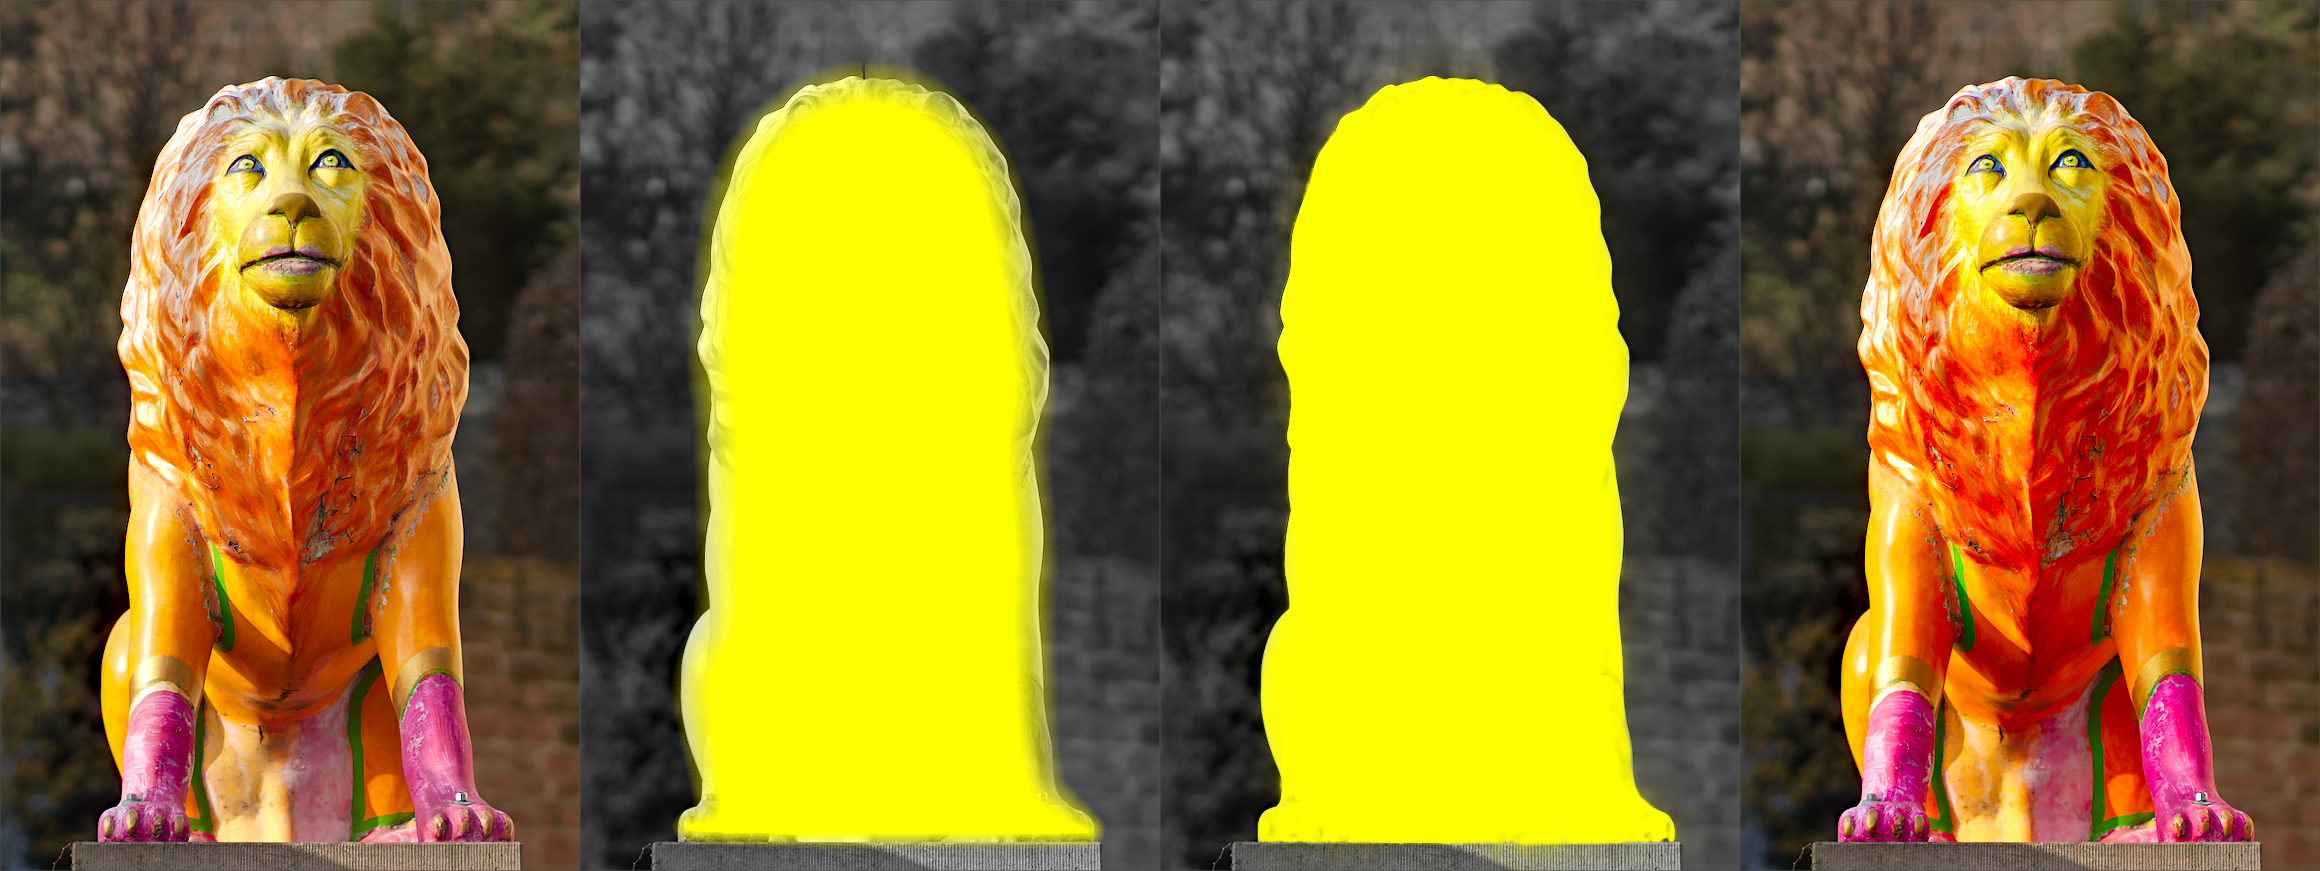
ການສ້າງໜ້າກາກແບບແຕ້ມໃຫ້ກວມເອົາວັດຖຸໃດໜຶ່ງຢ່າງຊັດເຈນອາດຈະເປັນເລື່ອງທີ່ໜ້າເບື່ອ. ໃນຕົວຢ່າງນີ້, ພວກເຮົາຕ້ອງການເພີ່ມຄວາມຄົມຊັດຂອງສີໃຫ້ກັບຮູບປັ້ນສິງໂຕໃນຮູບທາງຊ້າຍ ໂດຍບໍ່ໃຫ້ມີຜົນຕໍ່ພື້ນຫຼັງ.
-
- ຮູບທຳອິດສະແດງຮູບຕົ້ນສະບັບທີ່ຍັງບໍ່ໄດ້ປັບແຕ່ງ.
-
- ຮູບທີສອງສະແດງການເລືອກຮູບປັ້ນແບບຄ່າວໆດ້ວຍໜ້າກາກແບບແຕ້ມ. ຈະເຫັນວ່າໜ້າກາກ ຍັງບໍ່ຊັດເຈນ ແລະ ບໍ່ໄດ້ໄປຕາມຂອບຂອງຮູບປັ້ນສິງໂຕຢ່າງລະອຽດ.
-
- ຮູບທີສາມສະແດງຜົນຈາກການປັບລັດສະໝີຂອບມົວ, ຄວາມທຶບແສງ ແລະ ຄວາມຄົມຊັດຂອງໜ້າກາກ, ເຊິ່ງເຮັດໃຫ້ໄດ້ໜ້າກາກທີ່ພໍດີກັບວັດຖຸໂດຍບໍ່ຕ້ອງອອກແຮງຫຼາຍ. ໃນຕົວຢ່າງນີ້ ລັດສະໝີຂອບມົວ ຖືກຕັ້ງເປັນ 50 ແລະ ລັດສະໝີຄວາມມົວເປັນ 5 ເພື່ອໃຫ້ໜ້າກາກນຽນຂຶ້ນ. ຄວາມທຶບແສງ ແລະ ຄວາມຄົມຊັດຖືກເພີ່ມເປັນ 0.3 ແລະ 0.5 ຕາມລຳດັບ.
-
- ຮູບສຸດທ້າຍສະແດງຜົນສຳເລັດ ເຊິ່ງການເພີ່ມສີ (ຜ່ານໂມດູນ color contrast) ມີຜົນສະເພາະກັບຮູບປັ້ນສິງໂຕເທົ່ານັ້ນ.
ການເຮັດຂອບມົວໜ້າກາກເຮັດວຽກໄດ້ດີເປັນພິເສດໃນຕົວຢ່າງນີ້ ເພາະຮູບປັ້ນແຍກອອກຈາກພື້ນຫຼັງທີ່ ມົວຢ່າງຊັດເຈນ. ຂອບທີ່ເຫັນໄດ້ຊັດເຈນຂອງຮູບປັ້ນຈະຊ່ວຍນຳທາງໃນການປັບຂອບມົວໃຫ້ກົງກັບ ຮູບຮ່າງຂອງຮູບປັ້ນ.