the mask panel
Table of Contents
The mask panel is where a module’s blending and masking are controlled. It holds everything needed to build a mask: creating shapes and parametric elements, importing masks from other modules, arranging elements into groups, choosing operators, and refining the result.
The panel always shows the mask of the focused module.
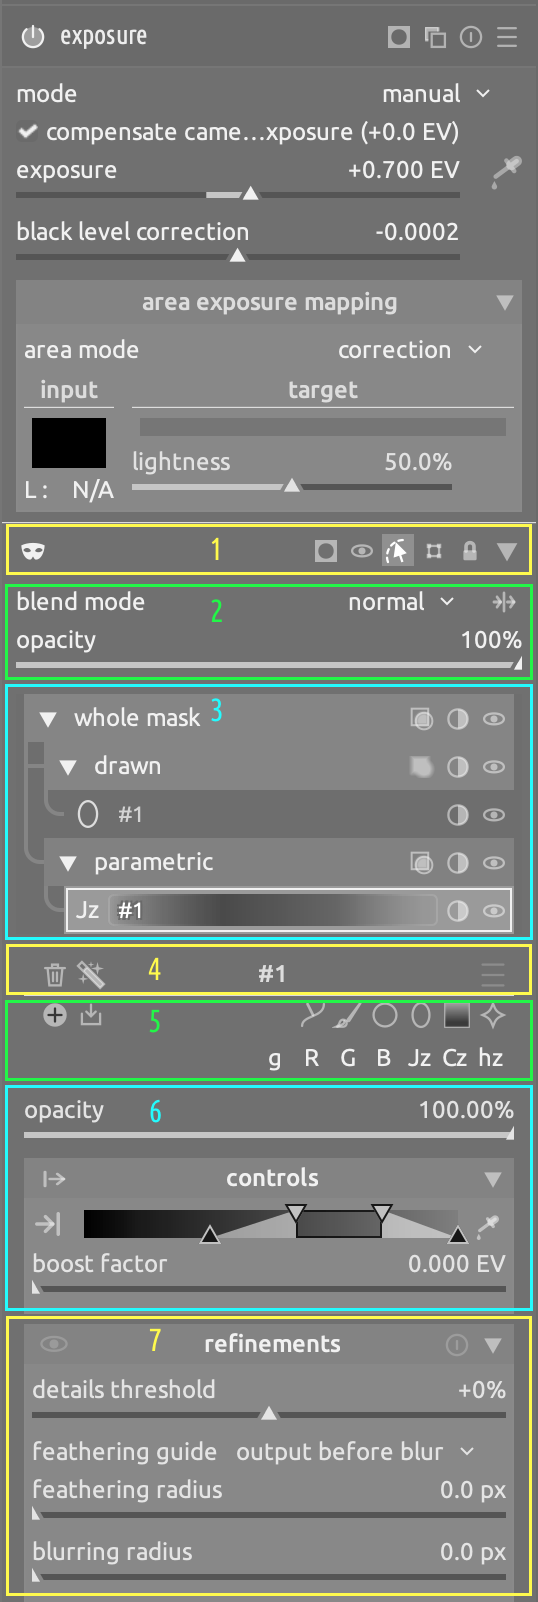
From top to bottom, the panel is made of:
- the panel header, with the mask on/off toggle and the display and editing buttons;
- the blending controls (blend mode, opacity);
- the mask layout: the tree of groups and elements that make up the mask;
- the selection caption, naming the selected member;
- the toolbar, to add groups, shapes and parametric elements and to import from other modules;
- the controls of the selected member;
- the help, refinements and mask consumers sections.
#panel position
The panel can be shown in one of three places, chosen in the mask options popover (interface options > panel position):
- embedded within each module
- The panel is shown at the bottom of each processing module that supports masks (default). Click the arrow at the right of the panel header, or an empty part of the header, to fold the panel away and give the module’s own controls more room.
- utility module, left panel
- The panel is moved to a utility module named masking, in the left-hand panel of the darkroom. It shows the mask of the focused processing module. See masking.
- separate panel, beside the canvas
- The panel is detached into a resizable panel beside the image. Move the mouse pointer to the left or right edge of the canvas to reveal a highlighted strip, and click it to open the panel on that side. When the panel is open, clicking on the strip at the opposite edge moves it across. Click the panel header, or the handle on its edge, to hide it again; drag the handle to resize it. A divider between the mask layout and the rest of the panel can be dragged, and each part scrolls on its own.
Whatever the position, the
 button in the bottom panel of the darkroom shows or hides the panel of the focused module. The icon is dimmed when the focused module has no mask. Right-click it to open the mask options without showing the panel.
#panel header
-
 mask on/off
- Switch the module’s mask on or off. While the mask is off, the module is not blended at all (see blending). Right-click to open the mask options.
-
 display mask
- Show the mask as a yellow overlay on a gray version of the image. The stronger the yellow, the stronger the module’s effect; plain gray means that the module does not apply there. An empty mask shows no overlay (the module applies everywhere): a message reminds you of the blend mode and opacity instead. Switches the module and the mask on if they are off.
-
 temporarily switch off mask
- Apply the module everywhere (at the blend opacity), to compare the result with and without the mask. This only affects the center view, not exports, and the mask switches back on when the module loses focus.
-
 edit on canvas
- Show the drawn shapes of the mask on the image, with their handles, so that they can be edited. Ctrl+click to enter restricted edit mode, where shapes cannot be moved or resized as a whole – useful to fine-tune the nodes of paths and brush strokes without the risk of moving them. Grayed out while the mask holds no drawn shapes.
-
 solo edit
- While enabled, only the selected shape, or the shapes of the selected group, are shown and editable on the image. The other members still contribute to the mask. This is useful when many shapes overlap.
-
 lock mask
- Lock or unlock the mask. A locked mask, including its parametric elements, cannot be edited and is kept as it is when the module is reset, or when a preset, a style or pasted module parameters are applied to the module. Discarding the history still removes it.
When the panel is in the separate or utility position, a row under the header names the module whose mask is shown (this can be disabled in the mask options).
#mask layout
The list under the blending controls shows the structure of the mask as a tree. The first entry is the whole mask; the members of each group are listed below its header and joined to it by a vertical rail. As in the pixelpipe, members are listed from the bottom up: a group starts from its bottom member and applies its operator to each member above it in turn.
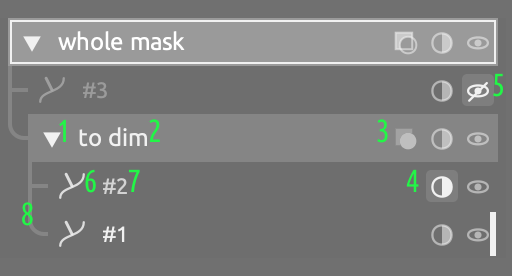
- group chevron
- group name
- group operator
- invert button
- visibility (eye) – here the top element is disabled, and shown dimmed
- element type icon
- element name
- rail joining the members of a group to its header
The list only shows the structure of the mask. The controls of the selected member are shown further down, in the controls section.
#group headers
Each group header shows, from left to right:
-
 chevron
- Fold or unfold the list of the group’s members. Groups start unfolded, and a group that holds the selection always stays open.
- group name
- Click to select the group; click it again to select the whole mask. Alt+click (Ctrl+click on macOS) to rename it. A warning sign is shown after the name if the group holds a member that has practically no effect (opacity below 10%).
-
 operator
- Shows the group’s operator. Click to choose another one.
-
 invert
- Invert the group’s result. Shift+click to instead flip the inversion of each of its members.
-
 visibility
- Disable the group: it keeps its members and its place, but contributes nothing to the mask. Shift+click to solo it: only this group is then used, as if every other member of the mask were disabled. Shift+click again to clear the solo.
#element rows
Each element row shows, from left to right:
- type icon
- An icon showing the kind of element (brush, circle, ellipse, path, gradient, raster mask, AI object). Parametric elements show the code of their channel instead (for example L, Jz or hz). The icon is filled when the element is inverted.
- element name
- Click to select the element; click again to deselect it. Alt+click (Ctrl+click on macOS) to rename it. Parametric elements show a strip with the range of values they select behind the name. A warning sign after the name shows that the element has practically no effect – for example, an opacity below 10%, a parametric range that still covers the whole span of its channel, or a raster mask whose source is no longer available. Hover over it for details.
-
 link
- Shown on raster masks and on linked shapes. On a raster mask, click to focus the module that produces the mask. On a linked shape, click to go to the next module that uses the same shape; Shift+click to give this module its own, independent copy of the shape.
-
invert
- Invert the element, so that it selects what it used to leave out.
-
visibility
- Disable the element, or Shift+click to solo it (as for groups).
A row with a dashed frame is a linked shape: it is shared with other modules, or appears more than once in this mask. Editing the shape changes it everywhere; the opacity, inversion and refinements of each row stay separate.
#arranging members
Drag a row or a group header to move it. Drop it onto a group to put it inside that group, or onto the top or bottom edge of a group to put it beside the group. A line shows where the member will land. Hovering over a folded group while dragging opens it.
#folded runs
When a group holds a long run of elements in a row (typically many brush strokes), only the top element of the run is shown, followed by a row that stands for the others. Click it, or the node on the rail next to it, to unfold the run. Groups are never folded, and a run that holds the selection is never folded away. The length of the runs that are folded can be set (or folding disabled) in the mask options.
#selecting members
Click a row or a group header to select it. The selected member is framed in the accent color, and the canvas highlights the corresponding shape. Hovering over a shape on the image highlights its row, and vice versa.
The selection decides where new elements go and what the controls and refinements act on:
- with a group selected, new shapes and parametric elements are added to that group;
- with an element selected, they are added to the group that holds it;
- with nothing selected (that is, with the whole mask selected), they are added to the whole mask.
#multiple selection
You can select several members at once, to delete, move or group them in one step:
- Ctrl+click (Cmd+click on macOS) a row or a header to add it to the selection, or to take it off.
- Shift+click to select the range of rows between the last selected one and this one.
- Ctrl+Shift+click (Cmd+Shift+click on macOS) to add such a range to the selection.
Selecting a group selects everything it holds. Taking one member of a selected group off the selection also takes off the group (which is no longer selected as a whole), but leaves its other members selected.
From two selected members on, the selection caption reads “n items selected” and the following buttons replace the toolbar and the controls:
- delete
- Delete everything selected. A group goes with its members.
- move into…
- Choose a group to move the selection into. The selected members are placed on top of that group, in the same order.
- group together…
- Choose an operator, and put the selected members together in a new group of that operator, at the place of the topmost of them. All selected members must be in the same group. When the selection is a single group, this button reads wrap in group….
While several members are selected, clicking the eye, invert or operator button of one of them applies the same change to all of them. Dragging is not possible. Click a single row to return to the usual panel. Undo restores the mask and the selection as they were.
#selection caption
The row below the mask layout names the selected member (or whole mask). When you hover over a shape on the image, it shows that shape’s name instead, highlighted. Alt+click the name (Ctrl+click on macOS) to rename the selected member.
-
 delete
- Delete the selected member. On a linked shape, this only removes it from this module’s mask. With the whole mask selected, this resets the mask to the default layout. Shift+click a group to empty it, keeping the group itself with its name and settings. You can also press Delete (the default shortcut for delete selection).
-
 restructure
- Open a menu to change the structure of the mask around the selection (see groups & operators: restructuring):
- wrap in group: put the selection in a new group of the chosen operator, where it is.
- compose: put the selection at the bottom of a new group of the chosen operator, with an empty group above it to draw into.
- simplify: remove the groups inside the selected group that change nothing. Groups that you have named are kept.
-
 group layout presets
- Apply a group layout preset within the selected group, or save the layout of the selected group as a new preset.
#toolbar

-
 add group
- Add a new, empty group to the selected group. Choose its operator from the menu.
-
 import
- Bring in what other modules already have:
- link shapes: add shapes or AI objects used by other modules, or not currently used, as linked shapes – editing one changes it everywhere.
- copy shapes: add independent copies of such shapes.
- copy parametric channel: copy a parametric element from another module using the same blend colorspace.
- add raster mask: add the mask of another module as a raster mask. Modules that come later in the pixelpipe are listed but cannot be picked.
- clean up unused shapes: delete every shape that is no longer used by any module. compress history and clean up unused shapes also compresses the history stack, which allows shapes still used by earlier history steps to be removed.
- Hovering over an entry previews it on the image.
- drawn shapes
- Path, brush, circle, ellipse, gradient and AI object. Click to draw one shape on the image; Ctrl+click to draw several shapes of the same kind in a row. Press Escape or right-click to stop. See drawn shapes and AI masking.
- parametric channels
- One button for each channel of the module’s blend colorspace (for example g, R, G, B, Jz, Cz, hz in “RGB (scene)”). Click to add a parametric element for that channel. Rest the pointer on a button to preview the channel on the image; Shift+click to keep that preview on until you Shift+click again.
#controls
The controls section shows the controls of the selected member and stays in the same place whatever is selected. While you hover over a shape on the image, it shows the controls of that shape instead.
- opacity
- Shown for every member, including groups and the whole mask: how strongly the member counts in its group. Double-click to reset to 100%. A group’s opacity is applied on top of its members’ own opacities. The opacity of the whole mask scales the mask itself (as shown in the mask overlay and passed on as a raster mask), whereas the blend opacity scales the module’s effect.
Below the opacity, a collapsible section holds the controls that depend on the kind of member:
- drawn shapes: size, and, depending on the shape, hardness, fade-out border, rotation, curvature, compression and shrink or grow (see drawn shapes);
- parametric elements: the range sliders (see parametric elements);
- while a shape is being drawn: its creation settings (for example the pen pressure and smoothing of the brush, or the settings of the AI object tool);
- raster masks, AI objects stored as pixels, groups and the whole mask have no controls besides opacity.
Click the section header to fold or unfold it. Shapes and parametric elements remember their state separately.
The sliders work as elsewhere in darktable: scroll to change the value, right-click to type a value, double-click to reset.
#mask options
Right-click the
toggle (or the
button in the bottom panel) to open the mask options popover. Settings under instance settings belong to the focused module; all others apply to every module.
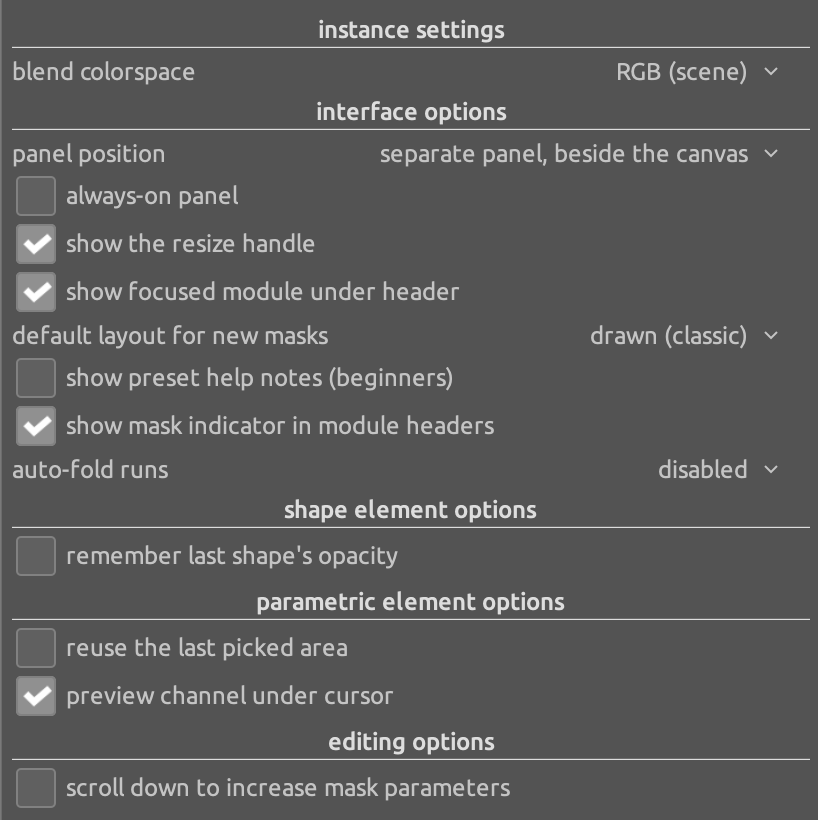
#instance settings
- blend colorspace
- The color space in which the module is blended and its parametric elements are evaluated. See blending options.
#interface options
- panel position
- Where the panel is shown – see panel position. With the panel beside the canvas, the following options are also shown:
- always-on panel: keep the panel open for every module, with or without a mask, as a column beside the image rather than over it. Hiding the side panel it is docked next to hides it too (default off).
- show the resize handle: show a handle on the edge of the panel. When hidden, the edge can still be dragged to resize the panel and clicked to hide it (default on).
- show focused module under header: name the module whose mask the panel shows, under the panel header (also in the utility module position; default on).
- default layout for new masks
- The group layout preset that a mask starts with when it is first switched on (default “drawn (classic)”).
- show preset help notes (beginners)
- Show help notes for groups created from built-in presets (default on).
- show mask indicator in module headers
- Show an icon in the header of every processing module that has a mask (default on).
- auto-fold runs
- Fold runs of 3 or 5 elements in a row, or never – see folded runs (default 3).
#shape element options
- remember last shape’s opacity
- New shapes start at the opacity last used for a shape. When disabled, every new shape starts at 100% (default on).
#parametric element options
- reuse the last picked area
- When you click the picker of a parametric element, its range is set at once from the area last picked in this module. Drag on the image to pick another area (default on).
- preview channel under cursor
- Rest the pointer on a parametric channel button to preview that channel on the image (default on).
#editing options
- scroll down to increase mask parameters
- By default, scrolling up over a shape increases its size, feather, opacity, hardness or curvature. Enable this option to scroll down to increase them instead (default off).
#shortcuts
The following actions can be assigned shortcuts. They are listed under <blending> > masks and act on the mask of the focused module: show/hide mask panel, add group in selected group, invert all members of selected group, invert output of selected group, invert selected element, delete selection (Delete by default), move selection into group, group selection, solo edit the selection, change operator of selected group, disable/enable selected group, preview channel under cursor and sticky opacity. The channel overlay section has one action per parametric channel, to show or hide its preview. The shape buttons and the controls of the selected member can also be assigned shortcuts.