import
Add images to the darktable library, optionally copying them from another location on the filesystem or from a connected camera.
See supported file formats for more information.
🔗module controls
The following buttons are shown in the module’s UI by default:
- add to library
- Add existing images to the darktable library without copying or moving files. If you only add a single image to the library it will be automatically loaded in the darkroom.
- copy & import
- Create copies of images from the filesystem and then add those copies to the darktable library.
When a camera is detected, a new section will appear in the module for that device. If you hover your mouse over the camera label, a tooltip will display information about the camera (model, firmware version etc.)
Depending on the capabilities of the camera, the following additional buttons may be displayed:
- mount camera
- Mount the camera for exclusive use by darktable. This button only appears if the camera is not currently mounted and is not locked by another process.
- copy & import from camera
- Create copies of images from the connected camera and then add those images to the darktable library. This button only appears if the camera is currently mounted.
- tethered shoot
- Open the tethering view so that you can take images with your connected camera using darktable. This button only appears if the camera is currently mounted.
- unmount camera
- Unmount the camera and release it for use by other applications. This button only appears if the camera is currently mounted.
🔗module parameters
Click on the “parameters” label or the expander button beside it to display the following additional options.
All parameters are retained from one session to the next and can be saved as module presets.
- ignore exif rating
- Check this option to ignore any rating stored within the image’s Exif data and instead use a hard-coded value (below).
- initial rating
- Initial star rating (from 0 to 5) to use for all newly-imported images (default 1).
- apply metadata
- Check this option to automatically set metadata fields and/or tags at import time (see below).
- metadata
- If the “apply metadata” box is checked, a list of the visible metadata fields is presented for completion (see metadata editor for details). Any populated strings are automatically added to the imported images. You can also choose from any presets saved within the metadata editor module.
-
Double-click on a label to reset the corresponding field. Double-click on the “metadata presets” label to reset all fields.
-
When preferences > storage > write sidecar file for each image is unchecked an additional column “from xmp” is presented so that you can choose to prevent the import of metadata from XMP files.
- tags
- If you want to add further tags by default when importing images, you can provide them here as a comma separated list. As with metadata you can also choose from any presets saved within the tagging module.
🔗import dialog
Each of the three import buttons (add to library, copy & import, copy & import from camera) uses a similar dialog for the import process, described in this section.
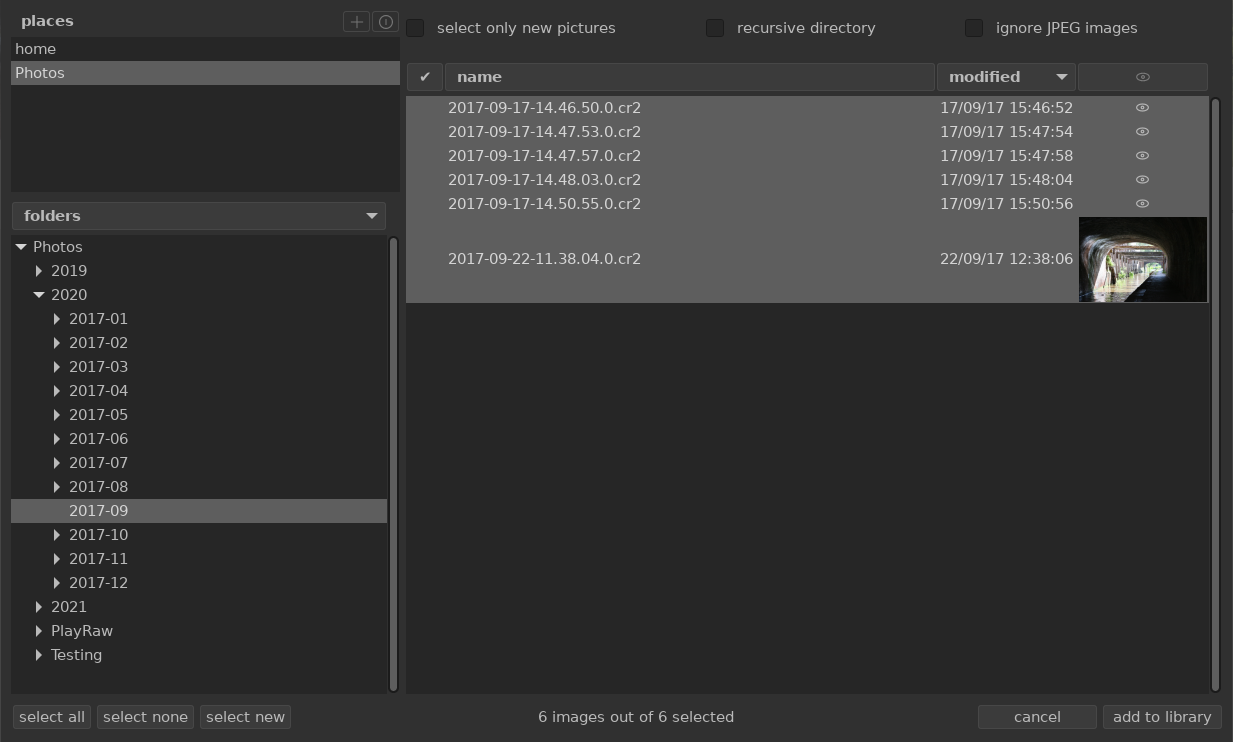
The following example screenshot is taken from the “add to library” button:
🔗common functionality
🔗places and folders
The import dialog is intended to allow you to set up common import locations, to make subsequent imports as simple as possible. When you first open the dialog, darktable attempts to add some common locations (home, pictures, mounted devices) to the places pane. You can add new places to the list by clicking on the + button and you can remove places from the list by right-clicking on them. If you wish to restore a default location that you have deleted, you can do this with the reset button.
When you choose a place, the folder tree is automatically populated (into the folders pane) from the root directory of the selected place. You can then navigate the folder tree and select a folder for import. The last selected place/folder is automatically reloaded the next time you open the dialog.
In the example screenshot above, you can see that a “place” has been created for the root of the Pictures folder and a sub-folder within that structure has been selected. This is the recommended workflow for the import process – you should not have to create new places very often.
🔗files
Once you have selected a folder, the files pane will automatically be populated with a list of the files found in that folder. By default, all files in the chosen folder are selected.
You can view thumbnails for any of the images by clicking on the
![]() icon. In addition, buttons are available at the bottom of the screen to select “all” files or “none”.
icon. In addition, buttons are available at the bottom of the screen to select “all” files or “none”.
Once you are happy with your selection, press Enter or click on the button at the bottom-right of the screen to import (this button will be named differently depending on the type of import being performed).
Press Escape or click the “cancel” button to exit without importing.
🔗common options
The following additional options are common to all import dialogs:
- recursive directory
- Check this option to import images in the selected folder and all subfolders. It is recommended that you not use this option to import a large number of images at the same time. The import process causes darktable to generate thumbnails for all of the imported images, but in the end it will only be able to keep the most recent in its cache. It is therefore better to import images in smaller chunks to avoid the performance penalty this imposes.
- ignore JPEG images
- Check this option if there are
JPEGimages in the same folder that you do not wish to import. This option is usually used where the camera storesRAW+JPEGand you only want to work on theRAWfiles, leaving theJPEGimages untouched.
🔗add to library
The “add to library” button allows you to add one or more existing images to the darktable library from the local filesystem. This process does not copy or move images but merely adds their details to the library database and creates XMP sidecar files for them.
- select only new pictures
- Tick this box to restrict the initial selection (when the dialog is loaded) to only those images that have not already been loaded into the darktable library. If you attempt to reload existing images into the darktable library, data for those images will be reloaded from the XMP sidecar files. A button is also available at the bottom of the dialog to select only “new” images for the currently-selected folder.
Note: “Add to library” does not create duplicates of your image files in a separate folder structure but processes them in-situ. The “add to library” process simply adds details of those images to darktable’s library database (and creates an XMP sidecar file if applicable) allowing the images to be viewed and developed.
This means that if you delete images from disk after having added them, darktable cannot access them any more. Moreover, darktable does not watch for changes in the filesystem. Any new images will not be shown until they are explicitly imported.
🔗copy & import
This option copies images from another location on your filesystem (including mounted storage devices) and then adds the copied images to the darktable library.
The following additional options are available to control the file and directory naming of the copied files. By default, only the “import job” option is shown – click on the “naming rules” label or the expander icon beside it to show additional options:
- import job
- The name of the import job (populated into the
$(JOBCODE)variable). - override todays’s date
- Enter a valid date/time (in
YYYY-MM-DD[Thh:mm:ss]format) if you want to override the current date/time used when expanding the variables$(YEAR),$(MONTH),$(DAY),$(HOUR),$(MINUTE)and$(SECONDS). Leave the field empty otherwise. - base directory naming pattern
- The base directory part of the naming pattern (default
$(PICTURES_FOLDER)/Darktable). Click on the icon beside the input field to choose a directory manually. - sub directory naming pattern
- The sub directory part of the naming pattern (default
$(YEAR)$(MONTH)$(DAY)_$(JOBCODE)). - keep original filename
- Check this box to keep original the filename instead of using the pattern below when importing.
- file naming pattern
- The file name part of the naming pattern (default
$(YEAR)$(MONTH)$(DAY)_$(SEQUENCE).$(FILE_EXTENSION)). - keep this window open
- Keep the window open after the import is complete, allowing multiple imports but with different naming options.
Most of these options can also be set in preferences > import. See this section for more information about the available variables.
🔗copy & import from camera
This option copies files from a connected camera to the local filesystem and then adds the copied images to the darktable library. It provides the same naming options as the “copy & import” dialog but does not allow places or folders to be selected.