denoise (profiled)
An easy to use and highly efficient denoise module, adapted to the individual noise profiles of a wide range of camera sensors.
One issue with a lot of denoising algorithms is that they assume that the variance of the noise is independent of the luminosity of the signal. By profiling the noise characteristics of a camera’s sensor at different ISO settings, the variance at different luminosities can be assessed, and the denoising algorithm can be adjusted to more evenly smooth out the noise.
Currently, darktable has sensor noise profiles for over 300 popular camera models from all the major manufacturers. If you generate your own noise profile for a camera that is not yet supported by darktable, be sure to share it with the darktable development team so they can include it in the next release! Please see darktable’s camera support page for more information.
🔗modes
The denoise (profiled) module implements two algorithms, each of which is available in either an easy-to-use “auto” mode, or a more advanced manual mode with additional controls:
- non-local means
- This algorithm works in the spatial domain in much the same way as the astrophoto denoise module. It averages each pixel with some surrounding pixels in the image. The weight of such a pixel in the averaging process depends on the similarity of its neighborhood with the neighborhood of the pixel being denoised. A patch with a defined size is used to measure that similarity.
-
Note that this algorithm is quite resource-intensive.
- wavelets (default)
- This algorithm works in the wavelet domain, and provides a simplified user interface. Wavelet decomposition allows you to adjust the denoise strength depending on the coarseness of the noise in the image. This mode can be used in either Y0U0V0 color mode (which allows you to independently control luminance and chroma noise) or RGB color mode (which allows you to independently control noise for each RGB channel).
-
The wavelet algorithm is less resource-intensive than non-local means.
🔗luma versus chroma noise
Both “non-local means” and “wavelet” algorithms can efficiently tackle luma (lightness) noise and chroma (color) noise.
In the past, it was suggested that you use two separate instances of this module to tackle chroma and luma noise independently (using chroma and lightness blending modes). This is no longer recommended, since the denoise (profiled) module is placed before the input color profile module in the pixelpipe (so that the profile parameters are accurate) and color blending modes should only be used after the input color profile has been applied.
The new algorithms in this module now provide their own methods to separately handle luma and chroma noise, and in both cases this can be handled with a single module instance.
🔗module controls
The denoise (profiled) module provides some controls that are independent of the algorithm used. These are described first, before moving on to the algorithm-specific controls.
When describing the controls specific to an algorithm, we will first cover the simplified interface, and then move on to the more advanced controls for that algorithm.
Note that sliders are provided with minimum and maximum values by default. However, these are only soft limits and, where needed, higher values can be entered by right-clicking on the slider and typing a new value.
🔗common controls
- profile
- darktable automatically determines the camera model and ISO based on the Exif data of your raw file, and searches for a corresponding profile in its database. If your image has an intermediate ISO value, settings will be interpolated between the two closest datasets in the database, and this interpolated setting will show up as the first line in the combo box. You can also manually override this selection if necessary. Re-selecting the top-most entry in the combo box will return you to the default profile.
- mode
- Choose which denoising algorithm to use (see above), and whether to present the simplified (“auto”) or full manual interface for that algorithm.
- whitebalance-adaptive transform
- As the white balance amplifies each of the RGB channels differently, each channel exhibits different noise levels. This checkbox makes the selected algorithm adapt to the white balance adjustments. This option should be disabled on the second instance if you have applied a first instance with a color blend mode.
- adjust autoset parameters (auto modes only)
- Automatically adjust all the other parameters on the current denoising algorithm using a single slider. This is particularly useful when you have had to increase the exposure on an under-exposed image, which normally introduces additional noise (as if you had taken the shot with a higher ISO). This control compensates for that by using settings similar to those used for a higher ISO image. The “effective ISO” used by the denoise algorithm is the actual ISO used, multiplied by the value of this slider.
- strength
- Fine-tune the strength of the denoising. The default value has been chosen to maximize the peak signal-to-noise ratio. It’s mostly a matter of taste – whether you prefer a low noise level at the cost of fine details, or you accept more noise to better preserve fine detail.
- preserve shadows (advanced mode only)
- Lower this control to denoise the shadows more aggressively. Usually, as noise increases, you will need to decrease this parameter.
- bias correction (advanced mode only)
- Correct any color cast that may appear in the shadows. Increase this value if dark shadows appear too green, decrease if they appear too purple.
🔗non-local means auto sliders
- central pixel weight (details)
- Control the amount of detail that should be preserved by the denoising algorithm. By default, this will have a low value, meaning that the algorithm will treat both luma and chroma noise equally. Move this slider to the right to reduce the amount of luma denoising, so that the algorithm will primarily affect chroma noise. By adjusting this slider together with the strength slider, you can find a good balance between luma and chroma denoising.
🔗non-local means advanced sliders
When you take non-local means out of auto mode, the adjust autoset parameters slider is replaced with the following controls. You can use the auto-adjust slider to arrive at some initial settings then, when you switch to manual mode, the sliders will show the equivalent manual settings. You can then continue to fine-tune the manual settings from the auto-set starting point.
- patch size
- Control the size of the patches being matched when deciding which pixels to average – see astrophoto denoise for more information. Increase this for images with more noise but be aware that high values may smooth out fine edges. The effect of this slider on processing time is minimal.
- search radius
- Control how far away from a pixel the algorithm will attempt to find similar patches. Increasing the value can give better results for very noisy images when coarse grain noise is visible, but the processing time is hugely impacted by this parameter (the processing time increases with the square of this parameter). A lower value will make execution faster, a higher value will make it slower. It most cases it is better to use the scattering parameter, which has a similar effect but without the heavy processing cost.
- scattering (coarse-grain noise)
- Like the search radius, this slider controls how far from a pixel the algorithm will attempt to find similar patches. However, it does this without increasing the number of patches considered. As such, processing time will stay about the same. Increasing the value will reduce coarse grain noise, but may smooth local contrast. This slider is particularly effective at reducing chroma noise.
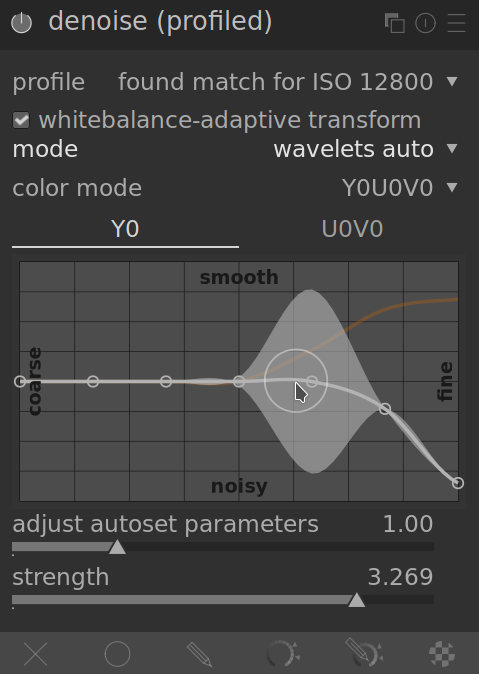
🔗wavelet curves
Wavelet curves are shown when one of the “wavelet” modes is selected.
The noise in an image usually consists of both fine grain and coarse grain noise, to varying degrees. The wavelet curves allow the strength of the denoising to be adjusted depending on the coarseness of the visible noise. The left end of the curve will act on very coarse grain noise, while the right of the curve will act on very fine grain noise. Raising the curve will increase the amount of smoothing, while lowering the curve will decrease it.
For example, you can preserve very-fine-grain noise by pulling the right-most part of the curve down. When tackling chroma noise (e.g. on a U0V0 curve, or on a second module instance with a color blend mode) you can safely raise the right side of the curve, since colors do not change a lot on fine scales. This can be useful if you see some noisy isolated pixels with the wrong color.
🔗wavelets Y0U0V0 color mode
The preferred way to use wavelets is with the Y0U0V0 color mode. This mode separates the denoising curves into luminance (Y0) and color (U0V0) components. You can then use the Y0 curve to control the level of luma denoising, and the U0V0 curve to control the level of chroma denoising.
🔗wavelets RGB color mode
Before the Y0U0V0 color mode was introduced, wavelet-based denoising could only be performed directly on the R, G and B channels, either together or individually.

If you want to denoise the RGB channels independently, the best way to do this is to use an instance of the color calibration module placed immediately before the denoise (profiled) module so that it outputs a gray channel based on the red channel only, then denoise that monochrome image using the red wavelet curve. Repeat this procedure for the blue and green channels. This procedure is time-consuming, but gives the best result because looking at the color of a noisy pixel is not a reliable way to determine which channel to adjust. For example, a noisy red pixel could be due to a noise peak on the red channel, but could also be due to a noise lull on the blue and green channels.
The issue with independently denoising the RGB channels is that there can still be some residual chroma noise at the end that requires excessive smoothing to eliminate. This was in fact one of the key motivations behind implementing the Y0U0V0 color mode.
🔗wavelets advanced sliders
When you take wavelets out of auto mode, the adjust autoset parameters slider is replaced with the preserve shadows and bias correction controls listed above in the common controls section.