presets
Presets allow you to store commonly-used module settings for future use. Some modules already come with pre-defined (internal) presets and you may also define your own (user-defined). Both internal and user-defined presets can be shown by clicking the presets menu in the module header.
Most of the functionality described here applies to processing modules only. However, presets can also be used with some utility modules. When used with utility modules, the functionality to auto-apply or auto-show presets based on image Exif data is not available.
Please note that, for processing modules, the saved preset also includes the active state of the module. You can use this to create your own default settings, which you can activate on-demand. Simply set your desired defaults, disable the module, and save the preset.
🔗the presets menu
The presets menu will contain one or more of the following entries depending on the presets that are defined or selected for the current module:
- preset list
- A list of the presets available for the current module. The currently selected preset (if any) is shown in bold and with a small check mark beside it.
- edit this preset
- If a preset has been selected, edit the selected preset (see below).
- delete this preset
- If a preset has been selected, delete the selected preset.
- update preset [name]
- Update the named preset to match the module’s current parameters.
- store new preset
- Create a new preset using the module’s current parameters.
Click on a preset name to apply the preset to the current instance of the module. Right-click on a preset name to create a new instance of the module and apply the selected preset to it. You can also apply a preset at any time while you are in the darkroom using a keyboard shortcut – if you have assigned one (see preferences > shortcuts).
🔗creating and editing presets
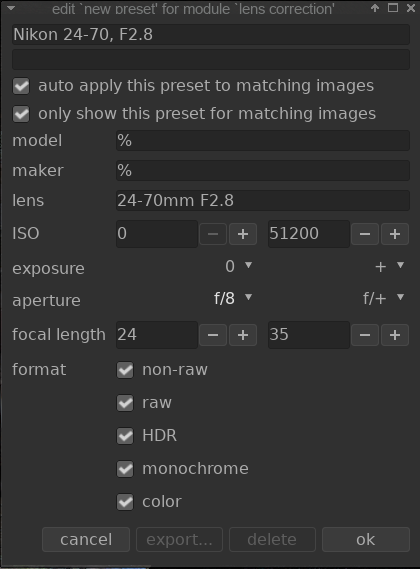
When creating or editing presets, the following dialog is shown:
🔗controls
- name
- The name of the preset
- description
- A searchable description for the preset (optional)
- auto apply this preset to matching images (processing modules only)
- Check this box to automatically apply this preset to matching images when they are opened in the darkroom for the first time (you can reapply such automatic presets by Ctrl+clicking on the reset button in the module header). Additional controls will appear to allow you to define which images the preset will be applied to based on image Exif data (see below).
-
For example, if you want a preset to be applied to all images from a specific camera leave all fields at default values except for “model”. Leave all fields unchanged to auto-apply a preset to all images.
-
The example dialog above sets up following rules: if the lens name matches, the aperture is greater than or equal to f/8 and the focal length is between 24 and 35mm the preset will be automatically applied.
-
The image information module displays the camera model and lens name for each image. Use this to ensure you have the correct spelling.
- only show this preset for matching images (processing modules only)
- Check this box to automatically show the preset in the preset menu, using the same set of filters.
🔗filter criteria
The following criteria can be used to auto-apply or auto-show presets for processing modules:
- model
- A pattern to be matched against the Exif field that describes your camera model; use % as wildcard.
- maker
- A pattern to be matched against the Exif field that describes the maker of your camera; use % as wildcard.
- lens
- A pattern to be matched against the Exif field that describes your lens; use % as wildcard.
- ISO
- Only apply the preset if the ISO value of your image lies within the given range.
- exposure
- Only apply the preset if the exposure time of your image lies within the given range; set + as the upper value to match arbitrarily long exposures.
- aperture
- Only apply the preset if the aperture of your image lies within the given range; set f/0 as the lower value to match arbitrarily open apertures; set f/+ as the upper value to match arbitrarily closed apertures.
- focal length
- Only apply the preset if the focal length of your image lies within the given range (from 0 to 1000).
- format
- Only apply the preset to certain types of image. Check a box to include files matching a criterion; uncheck the box to exclude those files. Choose from “raw”, “non-raw”, “HDR”, “monochrome” and “color”.
Note: If you deselect both “raw” and “non-raw” the filter will not apply to any files (since all supported files are either raw or non-raw). Similarly if you deselect both “monochrome” and “color”.
🔗managing presets
Both user-defined and internal presets can be viewed and managed from within preferences > presets.
Note: If you create a user-defined preset with the same name as a built-in preset, your preset will override the built-in version, which will no longer be accessible.
If you delete a preset that has the same name as one of the built-in presets, then your user preset will be deleted, and that preset name will no longer appear in the preset menu at all. The next time you start darktable, the corresponding built-in preset will once again become visible.