tone equalizer
Dodge and burn while preserving local contrast.
When used together with filmic rgb, this module replaces the need for other tone-mapping modules such as the base curve, shadows and highlights, tone curve and zone system (deprecated) modules. It works in linear RGB space and utilizes a user-defined mask to guide the dodging and burning adjustments, helping to preserve local contrast within the image.
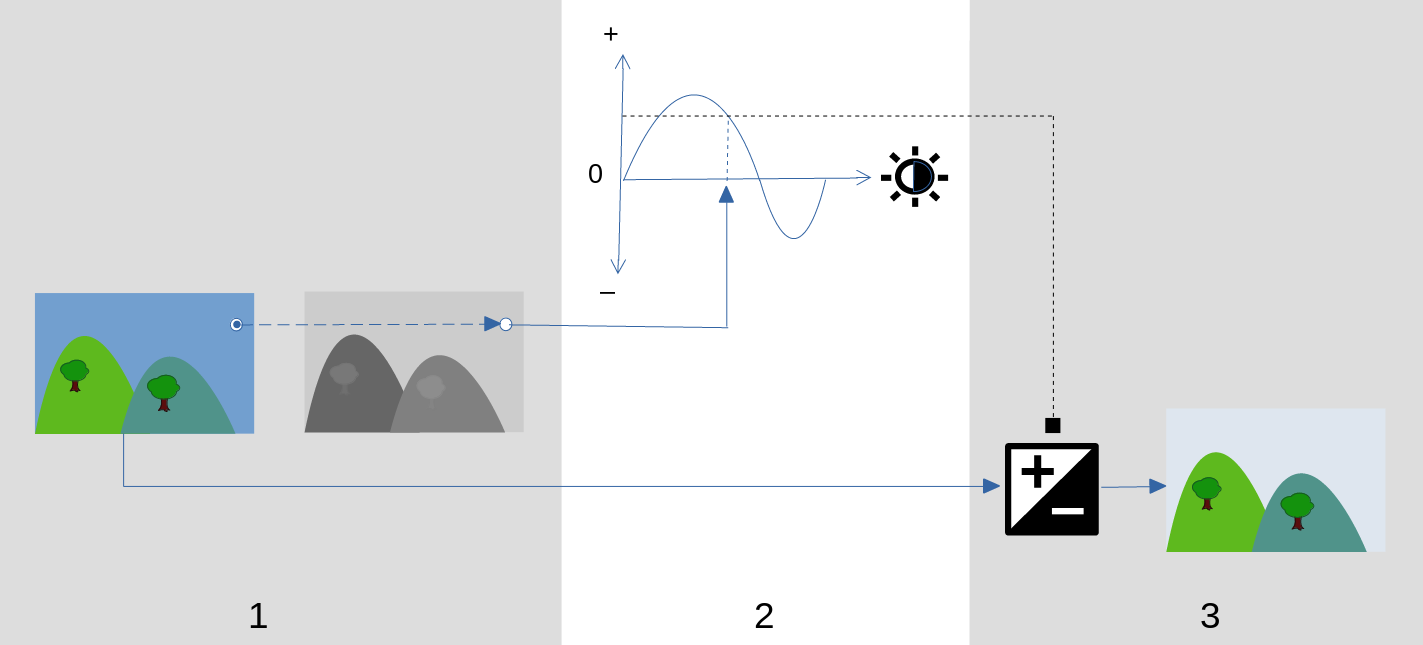
The following diagram describes how the tone equalizer works:
-
Create a monochrome guided mask that divides the input image into regions of similar luminosity. The resulting mask should blur the fine details within the image so that pixels within each region are all treated similarly, preserving local contrast.
-
Adjust the sliders in the simple tab or the equalizer graph in the advanced tab to alter the brightness of the underlying image, based on the brightness of the mask. Exposure can also be adjusted by scrolling with the mouse while hovering the cursor over the preview image (see cursor indicator/control for details).
In the simple tab, each slider corresponds to a single brightness zone (EV) in the mask, which can be raised or lowered to adjust the exposure of the image where the mask’s brightness lies in that zone. Similarly, in the equalizer tab, the horizontal axis of the graph corresponds to the brightness level of the mask, and the vertical axis specifies the required exposure adjustment to pixels where the mask matches that brightness level.
-
The exposure of each pixel of the input image is adjusted using the mask and the equalizer graph. For each pixel, the module looks up the brightness of the mask at that point, finds the matching brightness on the horizontal axis of the equalizer graph, and increases or decreases the exposure accordingly (using the vertical axis of the graph).
It is important that the mask separates the image into regions of similar brightness, and that a suitable amount of blur is applied within those regions. This means that all of the pixels in each region will have their exposure adjusted similarly, without adversely affecting local contrast. Examine your image beforehand to identify which regions you wish to dodge and burn, and use the controls on the masking tab to ensure that those areas are reasonably separated in tone within the final mask. This will allow those regions to be adjusted independently.
🔗module controls
The controls of the tone equalizer module are divided between three tabs.
- display exposure mask
- Click on the icon to the right of this label to show/hide the module’s guided mask over the top of the image. This control is available in all three tabs.
🔗simple tab
This tab splits the brightness of the guided mask into nine zones (from –8 to 0 EV) and allows you to alter each zone independently. This is a simplified interface and is used to generate the same tone adjustment curve as shown in the advanced tab.
- –8 EV … 0 EV
- Each slider adjusts the exposure of all pixels where the guided mask has the given brightness. If the mask’s histogram is evenly spread over the entire tonal range, sliders towards the top generally affect the shadows, whereas sliders towards the bottom generally affect the highlights. You can check the spread of the histogram within the advanced tab.
🔗advanced tab
This tab allows you to control the same intensity levels as in the simple tab, though here they are represented as control points on a curve. Behind the curve is a histogram representing the intensity levels of the guided mask (not the underlying image). If the histogram is too bunched up, this means your mask doesn’t have a good spread of intensity levels, which makes it harder to independently control the brightness of the different parts of your image. It is therefore recommended that the histogram be adjusted so that it extends the entire range, covering as many control points as possible for maximum flexibility. You can adjust the mask using the controls in the masking tab.
Click+drag the control points on the curve to adjust the brightness of all pixels where the mask has the given intensity. If the mask’s histogram is evenly spread over the entire tonal range, control points to the left will generally affect the shadows, and control points to the right will generally affect the highlights. Moving a single control point will also affect control points on either side to ensure the curve remains smooth. This behaviour can be adjusted using the curve smoothing control.
- curve smoothing
- Control how the curve is interpolated between control points. Move the slider to the right to make the transitions between the control points more gradual, but beware that going past about 0.6 can introduce some instability (oscillations) in the curve due to mathematical constraints. Move the slider to the left for a more well-behaved curve, but beware that this can result in harsher tonal transitions that may damage local contrast.
🔗masking tab
This tab contains controls for adjusting the guided mask.
The purpose of the guided mask is to separate out areas with different tonal ranges so that they can be independently brightened or darkened by the tone equalizer. The masking filters are designed to allow sharp edges between these areas to be preserved, while blurring details within a given tonal range, so that the brightness can be adjusted without adversely impacting local contrast. Ideally the mask histogram shown in the advanced tab should be spread out across all of the control points.
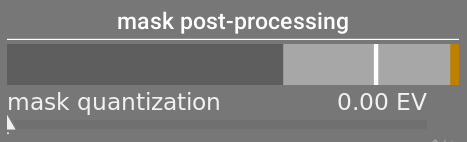
To avoid having to switch back and forth between the advanced and masking tabs, a gray bar under the “mask post processing” label displays a representation of the middle 80% of the histogram. By using the controls in this tab to center and spread out this gray bar, you can expect to have a nicely shaped histogram when you return to the “advanced” tab. If you see orange at either end of the gray bar, this means that part of the histogram is outside of the 9 EV range of the mask, and needs to be further adjusted.
When setting up the guided mask you will need to strike a balance between obtaining a smooth blur within tonal regions (to preserve local contrast) and preservation of the boundaries between those regions. Some experimentation will be required to find the best settings. Often the key controls to adjust are the exposure/contrast compensation sliders at the bottom of the module.
Displaying the guided mask while making these adjustments will help you to understand these controls and better judge the quality of the mask.
- luminance estimator
- Choose the method by which the luminance of a pixel will be estimated when mapping it to a mask intensity value (default RGB euclidean norm).
- preserve details
- Choose the smoothing algorithm used to blur the mask:
- no: Do not smooth the mask (the effect is the same as using normal tone curves). When the module is used to compress dynamic range, this option can cause compression of local contrast. This can be useful when increasing (local and global) contrast.
- guided filter: Use the original guided filter algorithm to blur the mask while attempting to preserve edges. One of the limitations of this algorithm is that the guided filter is exposure-sensitive, meaning that shadows tend to be blurred more than highlights. Note that this limitation can sometimes be an asset: if one wants to lighten shadows a lot, the guided filter can provide very good local contrast preservation.
- average guided filter: Use this option in cases where the effect of the guided filter is too strong. In this mode, a geometric mean is taken between the output of the original guided filter algorithm and the output given by the no option.
- eigf (default): The exposure-independent guided filter solves the problem of the original guided filter, in that it makes the degree of blurring independent of the exposure. This means the degree of blurring applied to the highlights and the shadows regions should be about the same. This improved algorithm is now the default option.
- averaged eigf: This option takes the geometric mean between the eigf mask and the mask generated by the no option, and is useful in cases where the degree of blurring in the mask needs to be mitigated.
- filter diffusion
- By default this is set to a value of 1, meaning that the filtering algorithm is run once on the input image to produce the blurred monochrome mask.
-
If you increase this to 2, the filtering algorithm will be run once on the input image to produce an intermediate mask, and then a second time on the intermediate mask. As a result, the final mask will be more blurred than when using a single iteration. Progressively higher values will diffuse the mask even further. However, because the mask filtering algorithm is run multiple times, each iteration will increase the processing time.
- smoothing diameter
- This controls how much of the surrounding image to take into account when calculating the mask’s blur at a particular point, defined as a percentage of the length of the image’s longer side (default 5%). With lower values, the transition between darker and lighter areas of the mask will be more pronounced. As the value is increased, transitions become smoother/softer. For the default exposure-independent guided filter (eigf), you should typically use blurring radii around 1-10%. With the original guided filter, blurring radii around 1-25% will typically yield better results.
- edges refinement/feathering
- Higher values force the mask to follow high contrast edges more closely. Lower values give smoother gradients, but may introduce halos. If required, feathering can be set to values as high as 10,000.
- mask post-processing
- This bar provides a representation of the current span of the mask’s histogram. It covers the middle 80% of the histogram, dropping the first and last decile to prevent outliers from skewing the indicator too much. Orange indicators at either end mean that the histogram exceeds the upper or lower bounds of its 9 EV range.
- mask quantisation
- Apply a degree of posterisation to the mask, so that it tends to centre round a few discrete levels. In some cases, this may be useful to help separate out areas of your image into distinct masking levels.
- mask exposure compensation
- Adjust the mask’s histogram to the left or right. If you have used the exposure module to adjust the image brightness, you may need to offset that adjustment by using this slider to re-centre the mask’s histogram. Click on the wand icon to the right of the slider to set the exposure compensation such that the average of the mask’s histogram will coincide with the central –4EV control point. The slider can then be fine-tuned as required.
- mask contrast compensation
- Dilate (spread out) or compress the mask’s histogram. The wand icon to the right of the slider will propose a reasonable starting point, which can then be fine-tuned to optimize the spread of the histogram under the tone equalizer control points.
🔗cursor indicator/control
When the tone equalizer module is enabled and expanded, you can move the mouse pointer over the preview image to show a cursor that displays information about the pixel under the pointer. When this cursor is shown, the mouse wheel can be used to brighten or darken the areas of your image that match the mask intensity level at that point. This provides a convenient way to quickly brighten or darken specific parts of the image.
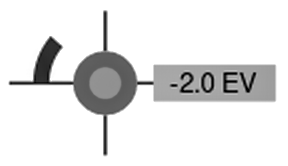
- the cross-hairs indicate the position of the pixel under the cursor
- the text label shows the intensity of the guided mask at that point, in EV
- the shade of the outer circle indicates the intensity of the mask at that point
- if the tone equalizer has brightened or darkened pixels matching this mask intensity, the magnitude of the adjustment is indicated by an arc on the left-hand-side. The longer the arc, the greater the brightness adjustment,
- if there has been an exposure adjustment, the shade of the inner circle indicates the amount of brightening or darkening, relative to the mask’s intensity at that point (as indicated by the outer gray circle). That is to say, if the pixel under the crosshairs has been brightened, the inner circle will be a lighter shade of gray than the outer circle; if the pixel has been darkened, the inner circle will be a darker shade of gray than the outer circle.
If you need to move or zoom the portion of the image shown in the center view while the module is expanded, hold down the ‘a’ key while dragging the mouse or using the scroll wheel. As long as the key is held down, mouse actions adjust the viewport rather than adjusting the tone curve.
🔗presets
The tone equalizer comes with several presets that can use used to compress shadows and highlights. Each comes in two variants, using either the guided filter (gf) or the exposure-independent guided filter (eigf). The variants using the guided filter tend to preserve local contrast in the shadows better those that use the exposure-independent guided filter, but at the price of reducing the local contrast in the highlights. Either of these variants may lead to better results, depending on the image. In both cases, the presets preserve middle-gray, so you shouldn’t need to adjust the global exposure after activating the tone equalizer.