mask refinement & additional controls
When a parametric or drawn mask is active, several additional sliders are shown which allow the mask to be further refined.
- details threshold
- This control allows you to alter the opacity of the mask based on the amount of detail in the image. Use this slider to select either areas with lots of detail (positive values) or areas that are flat and lacking in detail (negative values). The default (zero) effectively bypasses details refinement. This is mostly useful to apply sharpening and blurring effects that ignore out-of-focus (bokeh) regions or to sharpen only blurry parts, preventing over-sharpening of in-focus regions.
Note: The data used for the detail mask refinement is taken from the demosaic stage in the processing pipeline, and not from the module’s input (which is used for the other parametric mask criteria). None of the processing modules after demosaic will have any effect on the detail mask and it is not currently available for non-RAW images.
- feathering guide
- Mask feathering smooths a drawn or parametric mask such that the mask’s edges automatically align with the edges of features in the image. The smoothing is guided either by the module’s input or output (before blending), and may happen before or after the mask blurring, depending on what is selected in the “feathering guide” combobox. Feathering is particularly sensitive to the choice of guide image when used with edge-modifying modules (modules for sharpening or blurring an image).
- output before blur: feathering is guided using the output image of the module and takes place before the mask is blurred
- input before blur: feathering is guided using the input image of the module and takes place before the mask is blurred
- output after blur: feathering is guided using the output image of the module and takes place after the mask has been blurred
- input after blur: feathering is guided using the input image of the module and takes place after the mask has been blurred
- feathering radius
- Adjust the strength of the feathering effect. Feathering works best if the mask’s edges already approximately match some edges in the guiding image. The larger the “feathering radius” the better the feathering algorithm can align the mask to more distant edges. If this radius is too large, however, the feathered mask may overshoot (cover regions that the user wants to exclude). Feathering is disabled when the feathering radius is set to 0.
- blurring radius
- Blurring the mask creates a softer transition between blended and unblended parts of an image and can be used to avoid artifacts. The blurring radius slider controls the radius of a gaussian blur applied to the final blend mask. The higher the radius, the stronger the blur (set to 0 for an unblurred mask). Mask blur is always applied after feathering if both kinds of mask adjustment are activated. This allows any resulting sharp edges or artifacts to be smoothed.
- mask opacity
- The strength of the module’s effect is determined by the mask’s local opacity. Feathering and blurring the mask may reduce the opacity of the original mask. The “mask opacity” slider allows you to readjust the mask opacity to compensate. If the mask opacity is decreased (negative slider values) less opaque parts are affected more strongly. Conversely, if the mask opacity is increased (positive slider values) more opaque parts are affected more strongly. As a consequence, completely opaque portions of the mask always remain opaque and completely transparent portions always remain transparent. This is to ensure that regions that have been fully excluded from or included in a module’s effect (by setting the mask’s opacity to 0% or 100%) remain fully excluded or included.
- mask contrast
- This slider increases or decreases the mask contrast. This allows you to adjust the transition between the opaque and transparent parts of the mask.
-
 temporarily switch off mask
 - Sometimes it is useful to visualize a module’s effect without the mask being active. Click on this icon to temporarily deactivate the mask (the selected blend mode and global opacity remain in effect).
-
 display mask
 - Click on this icon to display the current mask as a yellow overlay over a black-and-white version of the image. Solid yellow indicates an opacity of 100%; a fully visible gray background image (without yellow overlay) indicates an opacity of 0%.
🔗example: feathering a drawn mask
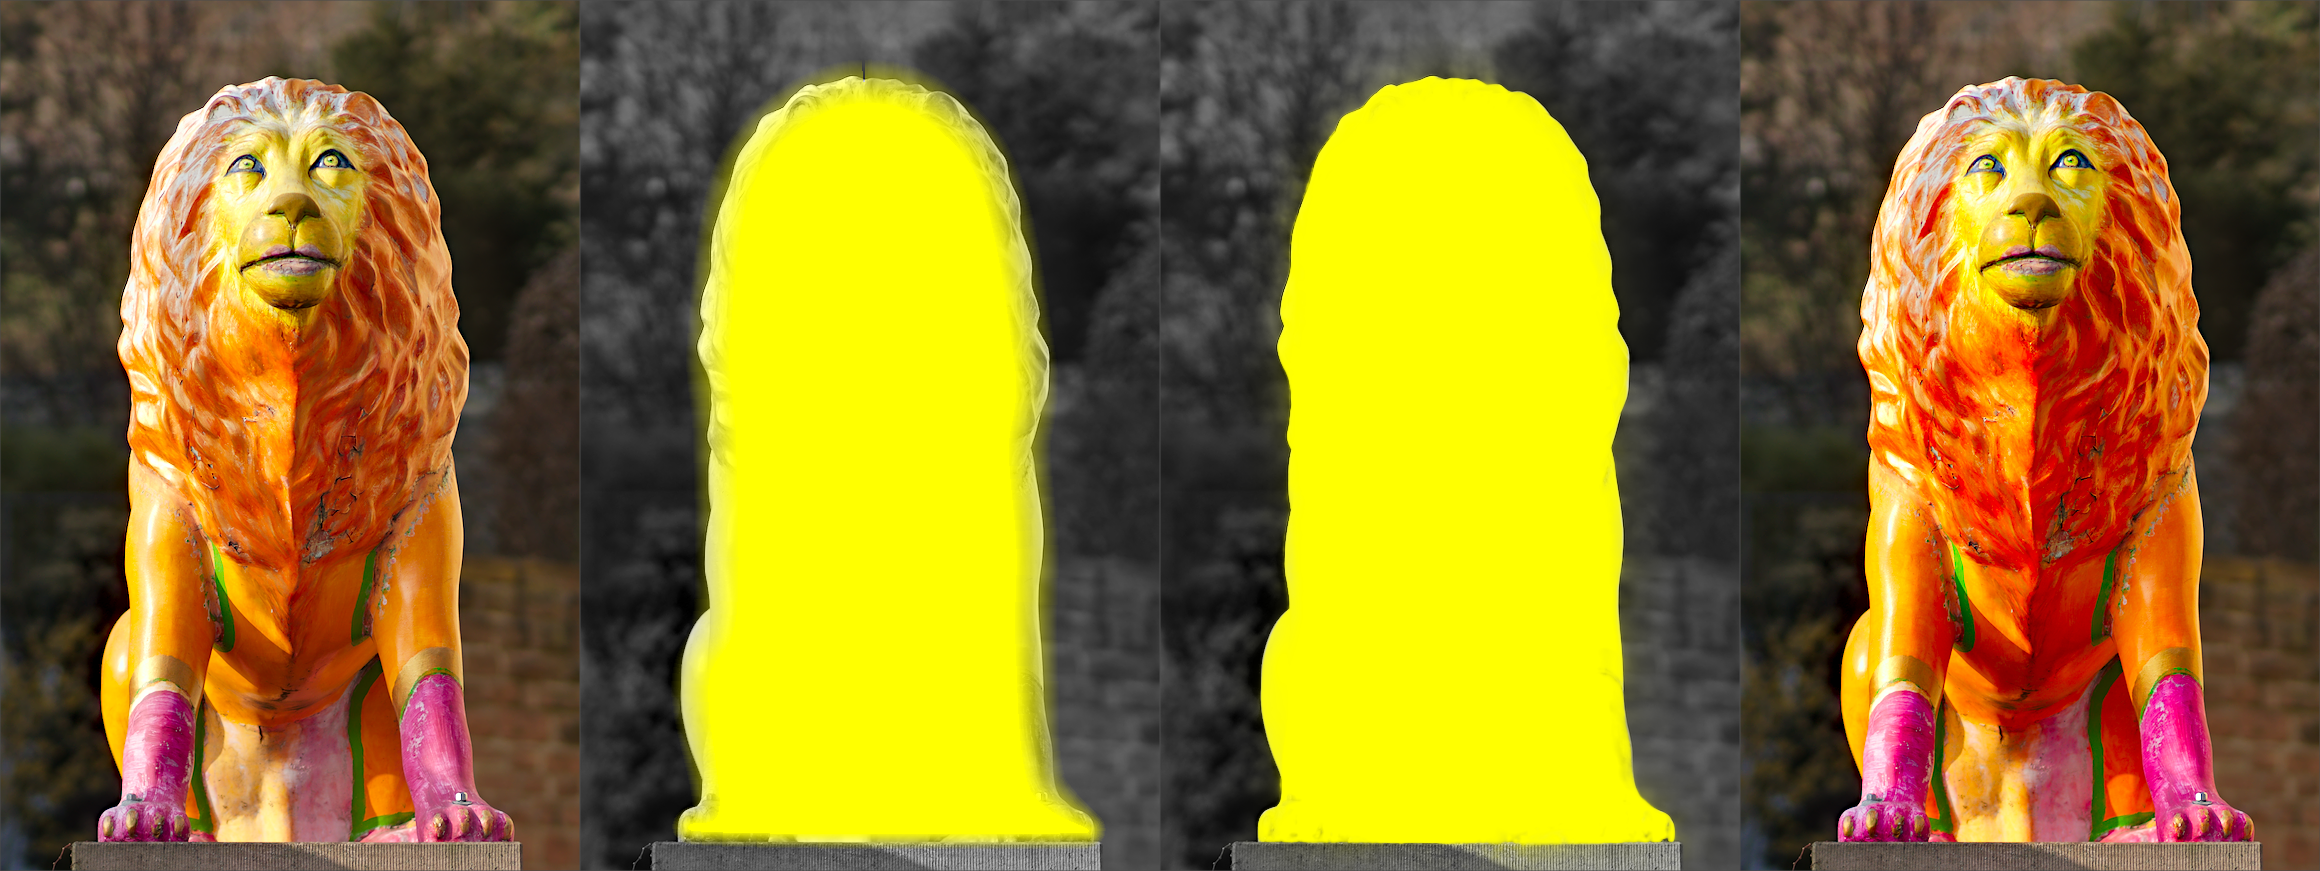
It can be rather tedious to create a drawn mask that precisely covers a particular feature in an image. In this example, we want to enhance the color contrast of the lion sculpture shown in the left image above without affecting the background.
- The first image above shows the original, unaltered image.
- The second image shows a rough selection of the sculpture created with a drawn mask. Note that the mask is rather fuzzy and does not precisely follow the outline of the lion sculpture.
- The third image shows the effect of adjusting the feathering radius, mask opacity and mask contrast, leading to a well matched mask with little effort. In this example the feathering radius has been adjusted to 50 and a blur radius of 5 was chosen to smooth the mask to some degree. The mask opacity and mask contrast have been increased to 0.3 and 0.5, respectively.
- The final image above shows the end result, where the color enhancement (via the color contrast module) is restricted to only the lion sculpture.
Mask feathering works particularly well in this example because the sculpture is well separated from the out-of-focus background. The distinct edge at the border of the sculpture guides the feathering mask adjustment to match the shape of the sculpture.
translations
- German (translation incomplete): Maskenanpassungen & zusätzliche Steuerelemente
- Polish (translation incomplete): uszczegóławianie maski i dodatkowe kontrolki
- Português (translation incomplete): refinamento da máscara e controles adicionais
- Ukrainian (translation incomplete): уточнення маски та додаткові елементи керування
- Dutch (translation incomplete): Maskers verfijnen & aanvullende afregeling