editing an image: workflow overview
This section will guide you through the basics of developing an image in the darkroom view, where an arsenal of modules is at hand to help you reach your creative goals.
To begin, open an image in the darkroom by double clicking its thumbnail in the lighttable view.
Each change you make to the image in the darkroom is turned into a history stack item. The history is stored in a database and in an XMP sidecar file for that image. All changes are automatically stored when you switch images or go from one darktable view to another. You can safely leave the darkroom or quit darktable at any time and come back later to continue your work. For this reason darktable does not need a “save” button and it does not have one.
On the left panel of the darkroom view is the history stack module, which lists the changes you have made, starting from the bottom – each edit adds a new item to the top of the stack. You can select an earlier point in the history to show how the image looked at that point. The stack can be compressed to remove redundant intermediate points in your edits – when you are happy with what you have done, just compress the history stack. Note that all edits above the selected history entry are permanently deleted when compressing the history stack.
A large number of processing modules are shipped with darktable, arranged into module groups. These groups are accessed via buttons at the top of the right-hand panel, just below the histogram.
🔗choosing a workflow
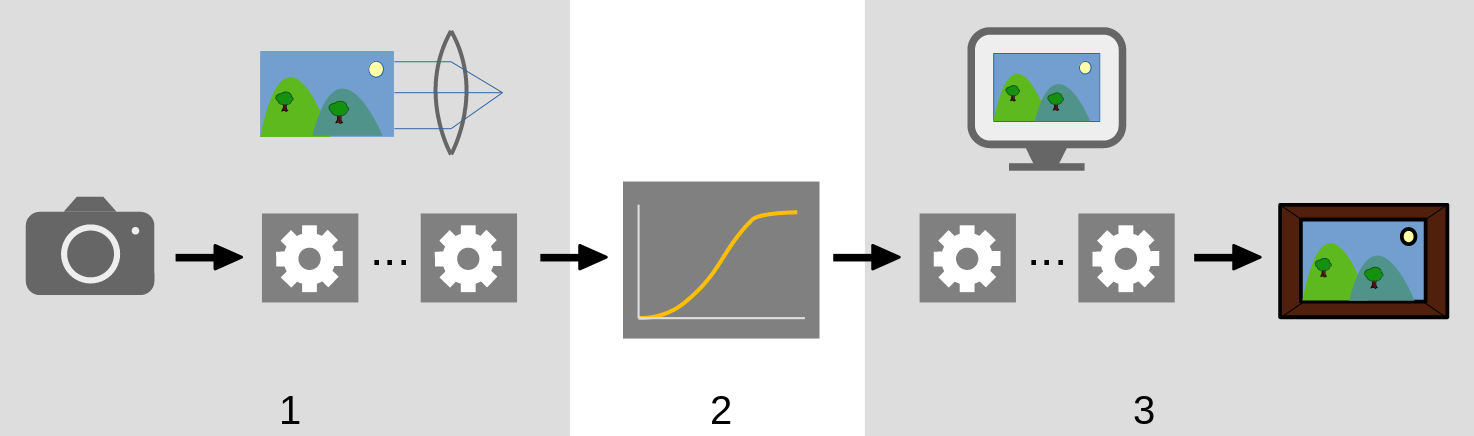
When processing an image, a sequence of processing modules is applied. This sequence is known as the pixelpipe.
-
Scene-referred modules are intended to process pixel values that are proportional to the amount of light collected by the camera at the scene. The dynamic range of an image in the scene-referred section of the pixelpipe is often larger than that of the display medium.
-
At some point in the pixelpipe, these pixel values are compressed by a tone mapping module into a smaller dynamic range more suitable for display on a monitor or a print.
-
The remaining modules operate in this non-linear display-referred section of the pixelpipe to produce the final output image.
Two default workflows are offered in darktable, which define the default starting point for your edits:
- scene-referred workflow assumes that you will do most of your post-processing in the scene-referred part of the pipeline, and perform dynamic range compression (to display-referred space) as late as possible. This is the default, and recommended, workflow for darktable. It uses the filmic rgb module to perform the tone mapping compression and applies a default exposure adjustment.
- display-referred workflow is a legacy workflow mode and operates in a similar manner to most other image processing software. In this mode, the tone mapping compression is performed much earlier in the pixelpipe, and many of the modules therefore operate in display-referred space. It uses the base curve module to perform the tone mapping compression.
A third option is to set the default workflow to none. In this case, the scene-referred workflow module order will be used by default but none of the above modules will be automatically applied. It is up to the user to arrange for appropriate tone mapping and reorder the modules where required. You can change your default workflow in preferences > processing > auto-apply pixel workflow defaults.
Note: when changing between scene-referred and display-referred workflow defaults, the new setting will only apply for newly developed images. If you have loaded an image in the darkroom using a different workflow setting, you will need to discard your previous edits and reset your workflow. Go to the history stack module in the darkroom view and press the reset button.