retouch
Remove unwanted elements from your image by cloning, healing, blurring and filling using drawn shapes.
This module extends the capabilities of the deprecated spot removal module (equivalent to this module’s “clone” tool) by including a “heal” tool (based on the heal tool from GIMP), as well as “fill” and “blur” modes. It can also take advantage of wavelet decomposition, allowing the image to be separated into layers of varying detail (from coarse to fine) which can be selectively retouched before being recombined to produce the output image.
🔗clone and heal
Cloning allows a part of the image (the target) to be hidden by replacing it with an area copied from elsewhere in the image (the source). For example, you may wish to remove a small cloud from a blue sky:
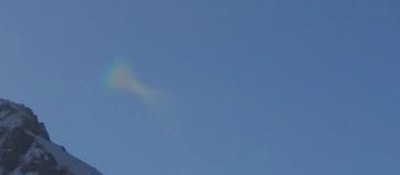
The simplest way to do this is with the cloning tool
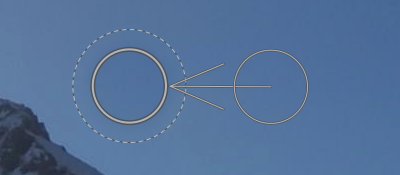
![]() . The following example uses a circular shape to clone out the cloud using the circle of blue sky beside it:
. The following example uses a circular shape to clone out the cloud using the circle of blue sky beside it:
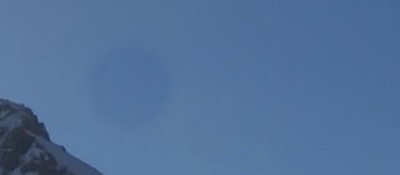
In many cases, the edges of the source shape won’t precisely match the surroundings of the target, leading to unnatural looking results. In this example, the sample of sky we chose as the source was slightly darker than the target, leaving a faint outline of the circular shape used in the cloning process:
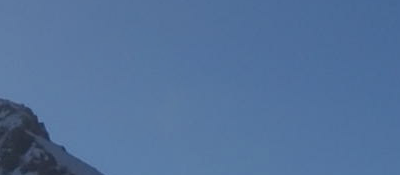
In such cases, the heal tool
![]() is more appropriate. With this tool, the color and luma of the sample is blended to fit better with the surroundings. In this example, using heal instead of clone produces a much more pleasing result:
is more appropriate. With this tool, the color and luma of the sample is blended to fit better with the surroundings. In this example, using heal instead of clone produces a much more pleasing result:
🔗source and target shapes
Once you have chosen heal or clone mode, you must choose the shape you wish to use (circle, ellipse, path or brush – see the drawn masks section for details). The source and target patches will both use the same shape.
When you hover over the image with your mouse, a plus symbol (+) will appear to indicate where the source shape will be placed by default. Your normal mouse cursor will indicate the position of the target shape:
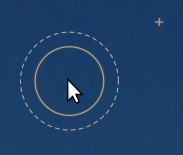
It is recommended that you choose the position of the source shape first, followed by the position of the target, as follows:
-
Shift+click to set the position of the source shape in “relative mode”. The position of the “plus” (+) symbol will move to the clicked location and will remain in a fixed position relative to your cursor until you click on the image to begin placing your target shape. If you place subsequent shapes without first changing the target location, the source shape will be placed at the same offset from the target shape as was used for the first stroke.
-
Ctrl+Shift+click to change the position of the source shape in “absolute” mode. As above, the position of the “plus” (+) symbol will move to the clicked location, but will remain in the same absolute position even if you move your mouse. You can then click on the image to begin placing the target shape. If you place subsequent shapes without first changing the target location, exactly the same source position will be used, fixed in the absolute coordinate system of the image.
Once you have placed your source and target shapes on the image, they can be adjusted manually with your mouse.
Note: For circle and ellipse shapes only, you can place both the source and target shapes with a single click-and-drag motion: Click on the desired target location and then drag, releasing your mouse button when you reach the desired source location. This operation does not affect the placement of subsequent shapes.
🔗fill and blur
The clone and heal tools both require the use of another part of the image to “fill in” the region being hidden. Sometimes there is no suitable sample in the image to use for this purpose. In such cases, the retouch module offers two further options:
-
 fill tool
 - Fill the drawn region with a selected color.
-
 blur tool
 - Apply a blur to the drawn region, smoothing out any details.
These two options are most useful when used together with wavelet decomposition, where they can be used to smooth over features within a selected detail layer.
🔗wavelet decomposition
Wavelets allow an image to be decomposed into a number of layers each containing varying levels of detail, so that you can work on each detail layer independently and then recombine them at the end. This is particularly useful in portrait photography, where you can deal with skin blotches and blemishes on a coarse layer of detail, leaving the finer skin texture untouched. The wavelets section provides more information on the decomposition process.
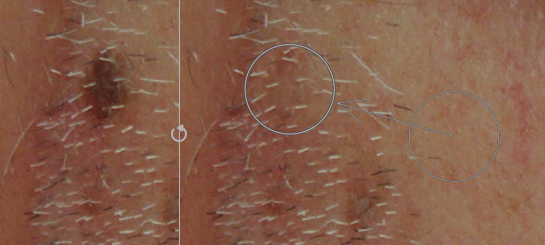
This method can be used with the healing tool, for example, to paint over a spot that appears in one of the coarse detail layers, while leaving the hairs in the fine detail layers intact:
It can also be used with the blur tool to even out coarse blotches in the skin, again without impacting the finer details (see the wavelets section for details on this technique).
🔗module controls
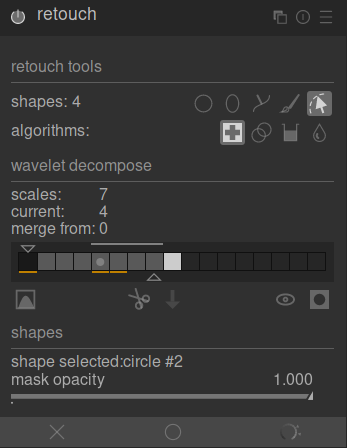
🔗retouch tools
The retouch tools section consists of two items:
- shapes
- The number after the shapes label indicates how many shapes have been placed on the image, either directly or within a wavelet layer.
-
Click on one of the shape icons to draw a new shape on the image (see drawn masks for details).
-
Ctrl+click on a shape icon to draw multiple shapes continuously (right-click to cancel).
-
Click the show and edit shapes
 button to show and edit any existing shapes for the currently-selected wavelet scale.
 - algorithms
- Choose a retouching algorithm (clone, heal, fill or blur). Ctrl+click to change the algorithm used for the currently-selected shape. Shift+click to set the default algorithm (used for new images or when you reset module parameters).
🔗wavelet decompose
The wavelet decompose section centres around a bar graph that shows how the image has been decomposed into detail (scale) layers. The key features of the bar graph are:
- The black square on the left represents the entire image before decomposition.
- The gray squares show the various wavelet detail layers, with fine details to the left, and coarse details to the right.
- The white square on the far right represents the residual image (the remainder of the image after the detail layers have been extracted).
- A light gray dot in a square indicates the currently-selected layer. Click on another square to select a different layer.
- The light gray bar running along the top indicates which levels of detail are visible at the current zoom level. Zoom in to see finer details.
- The triangle at the bottom shows how many layers the image has been decomposed into. Drag the triangle to the right to create more layers. Drag it to the left to decrease the number of layers. By default no wavelet decomposition is performed.
- The triangle at the top shows the current value of the “merge from” parameter (see below).
- The orange lines under the squares indicate which layers have retouch edits applied.
The remaining items in this section are:
- scales
- Shows how many detail layers the image has been decomposed into. Zero indicates that no wavelet decomposition has been performed.
- current
- Shows which layer is currently selected (also marked with the light gray dot on the bar graph).
- merge from
- This setting allows a single edit to be applied to multiple consecutive scales within a group starting from the coarsest scale (excluding the residual image) down to the scale selected. For example, if “merge from” is set to 3 and the maximum scale is 5 then all edits that are added to scale 5 will be applied to scales 3, 4 and 5. Edits added to scale 4 will be applied to scales 3 and 4, and edits added to scale 3 will be applied to scale 3 only. If you set merge from to 0, then merging is disabled, and all edits apply only to the scale that they are defined in. Setting merge from to the highest scale available (in this example, 5) also disables merging.
           merge_from
               v
   0   1   2   3   4   5    scale
               <-------o    scale 5 edits
               <---o        scale 4 edits
               o            scale 3 edits
           o                scale 2 edits
       o                    scale 1 edits
-
 display wavelet scale
 - Display the currently-selected wavelet layer on the center image. Selecting this option brings up an additional control – preview single scale.
- preview single scale
- An additional control that allows the black, white and gray points of the wavelet scale preview to be adjusted to make it easier to see. Click the
 to set these values automatically. This does not affect the module’s operation – only the wavelet scale preview.
 -
 cut
cut - Cut all shapes from the currently-selected layer and place them into the clipboard.
-
 paste
paste - Move the shapes on the clipboard to the currently-selected layer.
-
 temporarily switch off shapes
 - Toggle all shapes (whether on the current layer or not) on or off, temporarily removing the module’s effect.
-
 display masks
 - Show the target shapes associated with the currently-selected layer with a yellow overlay.
🔗shapes
This section allows you to modify settings related to the currently-selected shape:
- shape selected
- Indicates which shape is currently selected, and what type of shape it is.
- fill mode
- If the fill algorithm has been chosen for the currently-selected shape, choose whether to “erase” or fill the selected shape with a chosen “color”.
- fill color
- If a fill mode of “color” has been chosen, select the color to fill the shape with. You can click to select or enter a custom rgb value or use the color picker to take a sample from the image.
- brightness
- If the fill algorithm has been chosen for the currently-selected shape, fine-tune the color’s brightness. This slider also works in “erase” mode.
- blur type
- If the blur algorithm has been chosen for the currently-selected shape, choose whether to apply a “gaussian” or “bilateral” blur.
- blur radius
- If the blur algorithm has been chosen for the currently-selected shape, choose the radius of the blur.
- mask opacity
- Alter the opacity of the mask associated with the currently-selected shape. An opacity of 1.0 indicates that the shape is completely opaque and the module’s effect is fully applied, whereas a value less than 1.0 indicates that the effect applied by the shape is blended with the underlying image to the degree indicated by the slider.